Tubular Motor Installation
Tubular Motor Installation Guide
Step-by-step installation, wiring, limit setting and testing for blinds, shutters and awnings
Tubular motor installation includes inserting the motor into the roller tube, fixing the brackets, connecting power or receiver, setting upper and lower limits, and testing operation for smooth movement and accurate stopping.

Quick Answer: How Do You Install a Tubular Motor?
- Choose the correct motor and tube adapter.
- Insert crown and drive wheel.
- Slide the motor into the roller tube.
- Fix the tube and brackets.
- Connect power or receiver.
- Set upper and lower limits.
- Test smooth movement, noise and stopping accuracy.
Before Installation: What to Check
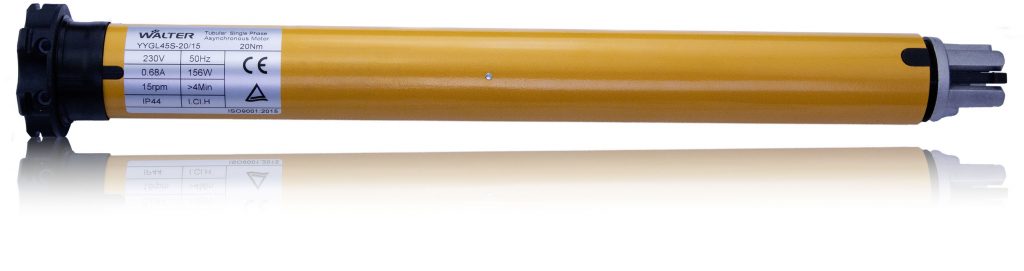
Motor diameter
Confirm 25mm, 35mm, 45mm or 59mm motor body size against the roller tube inner diameter and available installation space.
Tube diameter and profile
Check the tube outside diameter, inner profile and wall thickness before choosing the crown and drive wheel.
Torque
Calculate load and friction before installation. A motor that is too small may stop early or overheat; overspec torque can add cost and size.
Crown and drive wheel
Match both parts to the tube profile so the motor is centered and torque is transferred without slipping.
Bracket type
Confirm whether the project uses a standard bracket, star-head bracket, shutter bracket or special head-box bracket.
Voltage and wiring type
Separate AC mains wiring, low-voltage DC wiring, battery charging and receiver wiring before site work starts.
Limit type
Identify mechanical limit, electronic limit or receiver-based setting so the installer uses the correct adjustment method.
Control method
Prepare wall switch, receiver, remote, battery charger or smart control parts before the tube is mounted.
Cable routing
Plan the cable exit direction and strain relief so the cable is not pinched, pulled or exposed to moving parts.
Final test
After limit setting, test direction, noise, bracket stability, stopping position and smooth movement before handover.
Installation Tools and Accessories
| Tool / Accessory | Purpose | Buyer or Installer Note |
|---|---|---|
| Screwdriver | Fix brackets, end cap and adjustment parts | Use the correct size to avoid damage. |
| Drill | Prepare bracket fixing points | Check wall or head box material first. |
| Level | Keep brackets and tube aligned | Poor alignment causes noise and friction. |
| Measuring tape | Confirm tube and bracket position | Measure before cutting or drilling. |
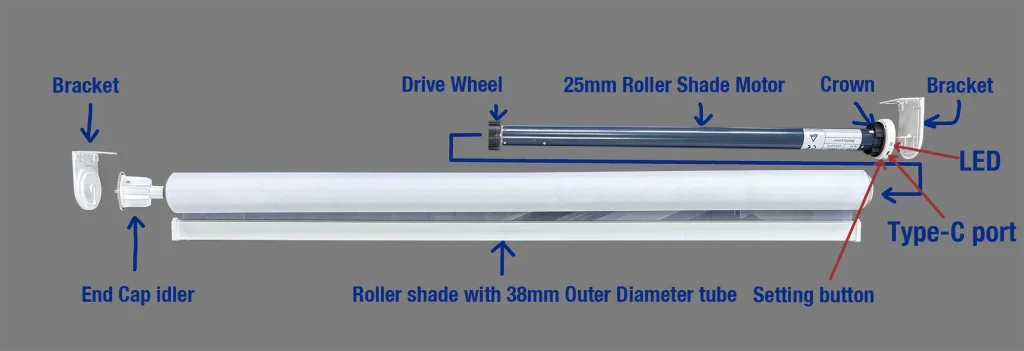
| Brackets | Hold motor head and idle end | Match bracket type with motor head. |
| Crown | Centers motor in tube | Must match tube profile. |
| Drive wheel | Transfers torque to tube | Wrong drive wheel may slip. |
| End cap | Supports idle end | Check fit and bearing condition. |
| Remote or wall switch | Controls movement | Match with receiver and wiring. |
| Insulation tape and cable ties | Cable organization | Avoid cable strain and moving parts. |
Step-by-Step Installation Process
Prepare motor, tube, brackets, crown, drive wheel, end cap, control device and tools.
Check all parts before assembly. Missing adapters or the wrong bracket usually cause rework after the tube is already installed.
Confirm tube profile and install crown and drive wheel.
Fit the crown and drive wheel firmly to the motor. They must match the tube profile so the motor remains centered and torque transfers correctly.
Insert the motor into the roller tube without pulling or damaging the cable.
Slide the motor into the tube carefully. Do not force the cable, bend it sharply or use the cable to pull the motor into position.
Fix the motor head bracket and idle-end bracket with correct alignment.
Use a level and measurement marks. Misaligned brackets increase friction, noise and load on the motor.
Connect wiring, receiver or power supply according to the motor type.
Follow the model wiring method and local electrical regulations. Qualified personnel should handle electrical connections when required.
Check direction and reverse if necessary.
Before setting final limits, run a short test to confirm up/down direction. Correct direction through the approved wiring or controller method for that motor type.
Set upper and lower limits.
Set the upper and lower stop positions carefully. Test each limit several times before connecting the final fabric or shutter load if the system allows it.
Test smooth movement, noise, stopping accuracy, bracket stability and cable safety.
Run the system through full travel. Confirm there is no cable strain, bracket movement, abnormal vibration, over-travel or continuous overload.
Electrical Safety Warnings
- Disconnect power before wiring or servicing an AC motor.
- Wiring should follow local electrical regulations.
- Qualified personnel should handle electrical connections when required by site rules or local law.
- Do not pinch, pull or sharply bend the motor cable during insertion and bracket fixing.
- Do not drill into the motor body or allow screws to contact the motor tube.
- Avoid continuous overload. Repeated overheating can shorten motor life and create project failures.
Wiring Comparison by Motor Type
Wiring method depends on the motor type and project control system. This guide explains selection and installation checks only; it is not a substitute for local electrical instructions.
| Motor Type | Typical Connection | Control Method | Installation Note |
|---|---|---|---|
| AC mechanical limit motor | Mains power through approved switch wiring | Wall switch or relay control | Confirm voltage, direction and limit adjustment before final operation. |
| AC receiver motor | Mains power plus built-in receiver | Remote or wall transmitter | Pair transmitter before limit setting and confirm radio frequency for the market. |
| DC motor | Low-voltage power supply or controller | Switch, controller or automation system | Check power supply rating and polarity requirements. |
| Battery motor | Internal battery with charging cable or solar option | Remote, receiver or smart controller | Plan charging access and confirm battery state before commissioning. |
| Smart motor | Power plus receiver or smart module depending on model | App, gateway, remote or automation system | Confirm protocol, pairing sequence and fallback control before delivery. |

Limit Setting and Direction Check
Set direction before final limits. Then set the upper and lower positions, run several full cycles, and confirm the system stops before the fabric, shutter or screen reaches a mechanical obstruction.
Mechanical limit switch
Usually adjusted with limit screws or a setting tool. Count adjustments carefully and test both travel directions.
Electronic limit setting
Stores positions electronically through the control procedure. Confirm memory is saved before final handover.
Receiver motor setting
Pair the remote or wall transmitter first, then set travel limits according to the receiver motor instructions.
Wrong direction correction
Correct direction before final limit setting. Direction may be changed by wiring, controller setting or remote procedure depending on the model.
Over-travel prevention
Never allow the curtain, shutter or blind to force against the head box, end stop or bottom position after limits are set.
Troubleshooting After Installation
| Symptom | Likely Cause | Installer Check |
|---|---|---|
| Motor does not start | No power, wrong voltage, loose connection or protection state | Confirm supply, controller, switch wiring and motor rating. |
| Wrong direction | Direction wiring or controller setting not matched | Correct direction before setting final limits. |
| Stops too early | Limit position too short, overload or friction | Reset limits and check load, bracket alignment and tube rotation. |
| Does not stop | Limit not set, wrong adjustment direction or receiver setting issue | Stop testing and reset limits before full operation. |
| Noise or vibration | Misalignment, loose bracket, adapter mismatch or tube friction | Check bracket level, crown/drive wheel fit and tube support. |
| Overheating | Overload, wrong torque or repeated continuous operation | Check torque selection, fabric load and duty cycle. |
| Remote not pairing | Wrong remote, frequency mismatch, pairing sequence error or receiver issue | Confirm model, market frequency and pairing procedure. |
Common Installation Mistakes
| Mistake | Cause | Result | How to Avoid |
|---|---|---|---|
| Wrong torque | Motor selected only by tube size | Cannot lift, overheats or stops during travel | Check load and application before ordering. |
| Wrong tube adapter | Crown or drive wheel mismatch | Slipping, vibration or off-center movement | Match tube profile and test fit. |
| Loose bracket | Insufficient fixing or weak mounting surface | Vibration and poor alignment | Use suitable fasteners and verify support. |
| Incorrect wiring | Wrong voltage, switch wiring or controller setup | No start, wrong direction or control failure | Follow model wiring rules and local regulations. |
| Poor alignment | Brackets not level | Friction, noise and reduced service life | Use level and measurement before fixing. |
| Wrong limit setting | Upper/lower position not adjusted | Stops early or over-travels | Set and test both limits. |
| Cable strain | Cable pulled, pinched or routed near moving parts | Electrical risk or early failure | Protect cable route and add strain relief. |
| No test run | Skipped final inspection | Hidden installation issue appears after handover | Run full cycles before delivery. |
Application-Specific Notes
Roller blinds
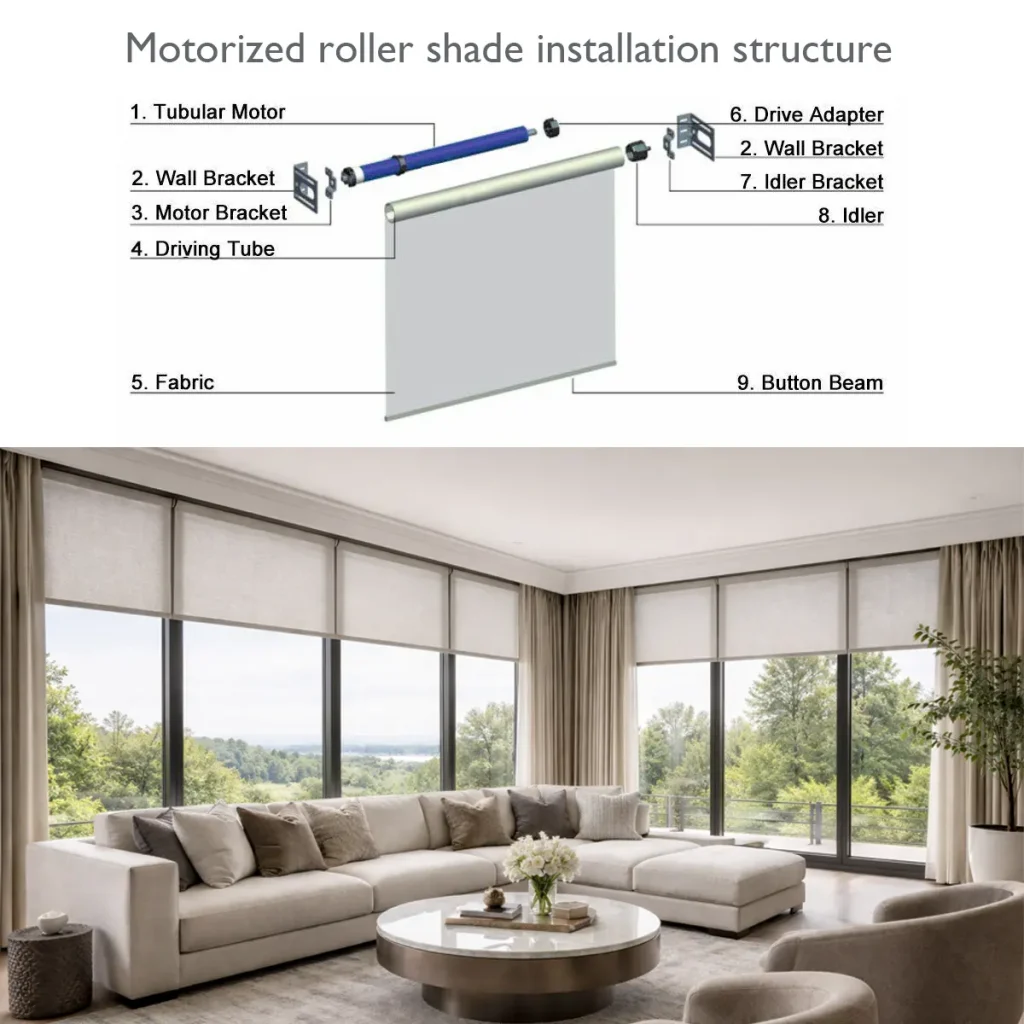
Roller blinds need smooth movement and quiet installation.
Roller shutters
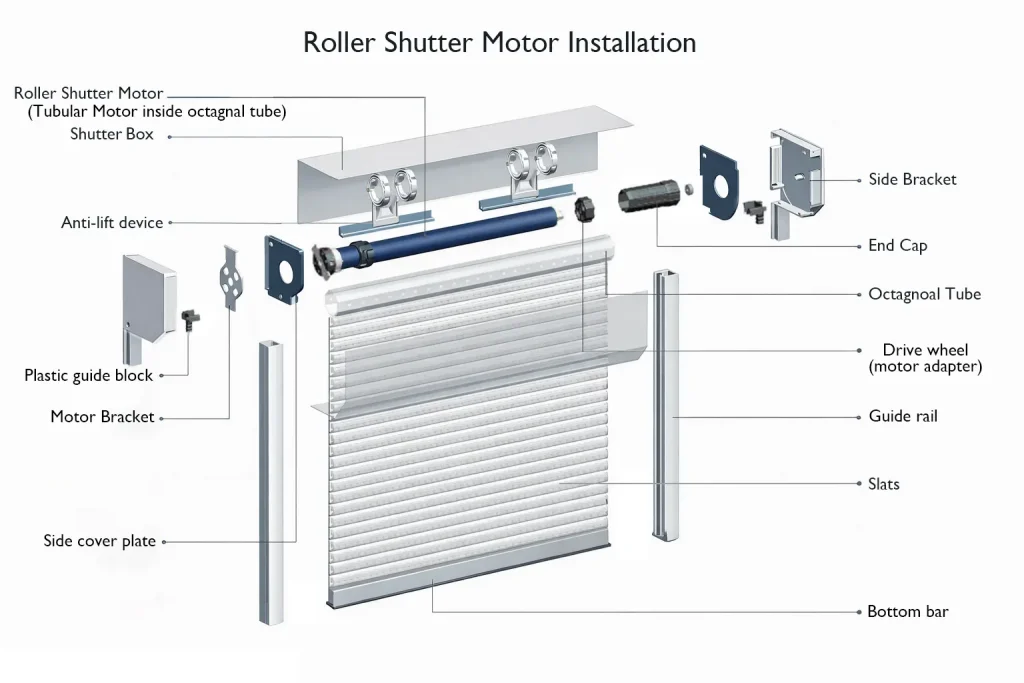
Roller shutters need torque, bracket strength and limit accuracy.
Awnings require torque, heat control and outdoor installation care.
Awnings require torque, heat control and outdoor installation care.
Zip screens
Zip screens need stable movement and wind-related application review.
Projection screens
Projection screens need quiet movement and accurate positioning.
Walter Manufacturing / Support Perspective
Walter supports motor selection, tube adapter matching, bracket and accessory support, limit type selection, OEM project communication and installation discussion for distributors and project buyers.
FAQ
How do you install a tubular motor?
Choose the correct motor and adapter, insert the crown and drive wheel, slide the motor into the tube, fix the brackets, connect power or receiver, set limits and test operation.
Can I install a tubular motor myself?
Some simple shading installations may be handled by experienced installers, but electrical wiring should follow local regulations and be handled by qualified personnel when required.
What tools are needed?
Common tools include a screwdriver, drill, level, measuring tape, brackets, crown, drive wheel, end cap, remote or switch, insulation tape and cable ties.
How do I set tubular motor limits?
Mechanical limits are adjusted by limit screws or tools, while electronic limits are stored through the control system. The upper and lower positions must be tested after setting.
What happens if the motor direction is wrong?
The blind or shutter may move opposite to the command. The wiring, controller direction or limit setup should be checked according to the motor type.
Why does the motor stop too early?
Common causes include incorrect limit setting, overloaded fabric or curtain, wrong torque selection or installation friction.
Why is the motor noisy after installation?
Noise can come from poor alignment, loose brackets, adapter mismatch, tube friction or an unsuitable motor for the load.
How do I choose the correct crown and drive wheel?
Match the crown and drive wheel to the roller tube profile and diameter so the motor is centered and torque is transferred without slipping.
Is wiring different for AC and battery tubular motors?
Yes. AC motors use mains wiring or receiver wiring, while battery motors use a battery and charging system. Always follow the correct wiring method for the model.
How can Walter help with installation support?
Walter can support motor selection, tube adapter matching, bracket and accessory choice, limit type selection and OEM project communication.
{“@context”:”https://schema.org”,”@graph”:[{“@type”:”WebPage”,”@id”:”https://www.waltermotor.com/tubular-motor/installation/#webpage”,”url”:”https://www.waltermotor.com/tubular-motor/installation/”,”name”:”Tubular Motor Installation Guide: Wiring, Brackets & Limit Setting | Walter”,”headline”:”Tubular Motor Installation Guide”,”description”:”Learn how to install a tubular motor inside a roller tube, including motor preparation, bracket fixing, wiring, limit switch adjustment, testing and common installation mistakes.”,”breadcrumb”:{“@id”:”https://www.waltermotor.com/tubular-motor/installation/#breadcrumb”},”primaryImageOfPage”:{“@id”:”https://www.waltermotor.com/tubular-motor/installation/#image-installMotor”},”mainEntity”:{“@id”:”https://www.waltermotor.com/tubular-motor/installation/#faq”}},{“@type”:”BreadcrumbList”,”@id”:”https://www.waltermotor.com/tubular-motor/installation/#breadcrumb”,”itemListElement”:[{“@type”:”ListItem”,”position”:1,”name”:”Home”,”item”:”https://www.waltermotor.com/”},{“@type”:”ListItem”,”position”:2,”name”:”Tubular Motor”,”item”:”https://www.waltermotor.com/tubular-motor/”},{“@type”:”ListItem”,”position”:3,”name”:”Installation”,”item”:”https://www.waltermotor.com/tubular-motor/installation/”}]},{“@type”:[“TechArticle”,”Article”],”@id”:”https://www.waltermotor.com/tubular-motor/installation/#article”,”headline”:”Tubular Motor Installation Guide”,”description”:”Learn how to install a tubular motor inside a roller tube, including motor preparation, bracket fixing, wiring, limit switch adjustment, testing and common installation mistakes.”,”about”:”tubular motor installation, how to install a tubular motor, tubular motor wiring, tubular motor limit switch adjustment, roller shutter motor installation, roller blinds motor installation”,”author”:{“@type”:”Organization”,”name”:”Walter Motor”,”url”:”https://www.waltermotor.com”},”publisher”:{“@type”:”Organization”,”name”:”Walter Motor”,”url”:”https://www.waltermotor.com”},”mainEntityOfPage”:{“@id”:”https://www.waltermotor.com/tubular-motor/installation/#webpage”},”image”:[{“@id”:”https://www.waltermotor.com/tubular-motor/installation/#image-installMotor”},{“@id”:”https://www.waltermotor.com/tubular-motor/installation/#image-starHead”},{“@id”:”https://www.waltermotor.com/tubular-motor/installation/#image-shutterDiagram”},{“@id”:”https://www.waltermotor.com/tubular-motor/installation/#image-wiring”},{“@id”:”https://www.waltermotor.com/tubular-motor/installation/#image-shadeStructure”},{“@id”:”https://www.waltermotor.com/tubular-motor/installation/#image-shadeInstall”}]},{“@type”:”FAQPage”,”@id”:”https://www.waltermotor.com/tubular-motor/installation/#faq”,”mainEntity”:[{“@type”:”Question”,”name”:”How do you install a tubular motor?”,”acceptedAnswer”:{“@type”:”Answer”,”text”:”Choose the correct motor and adapter, insert the crown and drive wheel, slide the motor into the tube, fix the brackets, connect power or receiver, set limits and test operation.”}},{“@type”:”Question”,”name”:”Can I install a tubular motor myself?”,”acceptedAnswer”:{“@type”:”Answer”,”text”:”Some simple shading installations may be handled by experienced installers, but electrical wiring should follow local regulations and be handled by qualified personnel when required.”}},{“@type”:”Question”,”name”:”What tools are needed?”,”acceptedAnswer”:{“@type”:”Answer”,”text”:”Common tools include a screwdriver, drill, level, measuring tape, brackets, crown, drive wheel, end cap, remote or switch, insulation tape and cable ties.”}},{“@type”:”Question”,”name”:”How do I set tubular motor limits?”,”acceptedAnswer”:{“@type”:”Answer”,”text”:”Mechanical limits are adjusted by limit screws or tools, while electronic limits are stored through the control system. The upper and lower positions must be tested after setting.”}},{“@type”:”Question”,”name”:”What happens if the motor direction is wrong?”,”acceptedAnswer”:{“@type”:”Answer”,”text”:”The blind or shutter may move opposite to the command. The wiring, controller direction or limit setup should be checked according to the motor type.”}},{“@type”:”Question”,”name”:”Why does the motor stop too early?”,”acceptedAnswer”:{“@type”:”Answer”,”text”:”Common causes include incorrect limit setting, overloaded fabric or curtain, wrong torque selection or installation friction.”}},{“@type”:”Question”,”name”:”Why is the motor noisy after installation?”,”acceptedAnswer”:{“@type”:”Answer”,”text”:”Noise can come from poor alignment, loose brackets, adapter mismatch, tube friction or an unsuitable motor for the load.”}},{“@type”:”Question”,”name”:”How do I choose the correct crown and drive wheel?”,”acceptedAnswer”:{“@type”:”Answer”,”text”:”Match the crown and drive wheel to the roller tube profile and diameter so the motor is centered and torque is transferred without slipping.”}},{“@type”:”Question”,”name”:”Is wiring different for AC and battery tubular motors?”,”acceptedAnswer”:{“@type”:”Answer”,”text”:”Yes. AC motors use mains wiring or receiver wiring, while battery motors use a battery and charging system. Always follow the correct wiring method for the model.”}},{“@type”:”Question”,”name”:”How can Walter help with installation support?”,”acceptedAnswer”:{“@type”:”Answer”,”text”:”Walter can support motor selection, tube adapter matching, bracket and accessory choice, limit type selection and OEM project communication.”}}]},{“@type”:”HowTo”,”@id”:”https://www.waltermotor.com/tubular-motor/installation/#howto”,”name”:”How to install a tubular motor”,”description”:”Eight practical installation steps for fitting a tubular motor into a roller tube, connecting the suitable control method, setting limits and testing operation.”,”step”:[{“@type”:”HowToStep”,”position”:1,”name”:”Prepare motor, tube, brackets, crown, drive wheel, end cap, control device and tools.”},{“@type”:”HowToStep”,”position”:2,”name”:”Confirm tube profile and install crown and drive wheel.”},{“@type”:”HowToStep”,”position”:3,”name”:”Insert the motor into the roller tube without pulling or damaging the cable.”},{“@type”:”HowToStep”,”position”:4,”name”:”Fix the motor head bracket and idle-end bracket with correct alignment.”},{“@type”:”HowToStep”,”position”:5,”name”:”Connect wiring, receiver or power supply according to the motor type.”},{“@type”:”HowToStep”,”position”:6,”name”:”Check direction and reverse if necessary.”},{“@type”:”HowToStep”,”position”:7,”name”:”Set upper and lower limits.”},{“@type”:”HowToStep”,”position”:8,”name”:”Test smooth movement, noise, stopping accuracy, bracket stability and cable safety.”}]},{“@type”:”ImageObject”,”@id”:”https://www.waltermotor.com/tubular-motor/installation/#image-installMotor”,”url”:”https://www.waltermotor.com/wp-content/uploads/2025/10/awning-motor-2-scaled.jpg”,”caption”:”Tubular motor inserted into a roller tube for installation reference.”,”description”:”Install a tubular motor inside a roller tube”},{“@type”:”ImageObject”,”@id”:”https://www.waltermotor.com/tubular-motor/installation/#image-starHead”,”url”:”https://www.waltermotor.com/wp-content/uploads/2025/10/starheadmotor-1-1024×271.jpg”,”caption”:”Star head tubular motor image used to explain head fixing and bracket alignment.”,”description”:”Star head tubular motor for bracket mounting”},{“@type”:”ImageObject”,”@id”:”https://www.waltermotor.com/tubular-motor/installation/#image-shutterDiagram”,”url”:”https://www.waltermotor.com/wp-content/uploads/2026/04/roller-shutter-motor-installation-1-1024×683.webp”,”caption”:”Roller shutter tubular motor installation diagram showing motor, tube, guide rails and head box.”,”description”:”Roller shutter tubular motor installation diagram”},{“@type”:”ImageObject”,”@id”:”https://www.waltermotor.com/tubular-motor/installation/#image-wiring”,”url”:”https://www.waltermotor.com/wp-content/uploads/2026/03/tubular-motor-wiring-diagram-limit-switch-1024×683.webp”,”caption”:”Tubular motor wiring diagram used for safe wiring concept explanation.”,”description”:”Tubular motor wiring diagram with limit switch”},{“@type”:”ImageObject”,”@id”:”https://www.waltermotor.com/tubular-motor/installation/#image-shadeStructure”,”url”:”https://www.waltermotor.com/wp-content/uploads/2026/04/Motorized-roller-shade-installation-structure-1024×1024.webp”,”caption”:”Electric roller shade structure showing motor, tube and end system.”,”description”:”Electric roller shade structure diagram with tubular motor”},{“@type”:”ImageObject”,”@id”:”https://www.waltermotor.com/tubular-motor/installation/#image-shadeInstall”,”url”:”https://www.waltermotor.com/wp-content/uploads/2026/03/roller-shade-1024×351.webp”,”caption”:”Roller shade installation diagram showing fabric, bracket, end cap, drive wheel and crown.”,”description”:”Roller shade installation diagram with fabric bracket end cap drive wheel and crown”}]}